Asian Sticky Ribs

IMG_3261.JPG

So, guess what happens when you’re Catholic boyfriend who can’t eat meat on Fridays during Lent isn’t home on a Friday during Lent? You make Asian Sticky Ribs (and save him some for Saturday with his morning eggs).

I was dying to make these ribs I’ve had in my freezer, but I get so bored of BBQ sauce. So I decided to go for an Asian inspiration. I know most Asian ribs are spare ribs, but this is what I had, and it was more the flavor profile I cared about.

That said, I will have to try this recipe again once I get a fully stocked pantry of the Asian persuasion. I need to get me some Ponzu, Mirin, Chinese Five Spice, and some Sriracha.

I made a modified version of this recipe with what I had on hand.

I marinated the ribs in this modified mixture:

  • ½ cup soy sauce
  • ½ cup ponzu sauce (Since I did not have ponzu sauce, they suggested to use an additional ¼ cup of soy sauce + the juice of ½ an orange, which I did.)
  • ½ cup packed light brown sugar
  • 2 TB honey mustard
  • 2 Tb honey
  • 2 tablespoons rice vinegar
  • 6 cloves of garlic, finely grated or minced
  • a few splashes of Worchestershire
  • 1/2 tsp ground ginger, (this made me go buy fresh ginger for the next time, it’s just way better)
  • 2 tablespoons water

This marinated overnight. The next morning the entire thing (ribs and marinade) into the crock pot for the day. 8 hours.

That night I took them out and laid them in a pan, and glazed them with a quick soy sauce and honey glaze, and put them in the oven to caramelize, glazing every 3 minutes. When they came out 10 minutes later, I garnished with some fresh scallions. They fell off the bone so fast I had to eat them with a fork! That was gooood.


Chicken Enchilada with Green Chile Sour Cream Sauce

IMG_3244

I was craving Mexican food and hate how so many restaurants feel American bastardized and fake. I’m not saying my food is authentic anything, but at least it was fresh.
Ingredients
  1. 8 soft taco size flour tortillas
  2. 2 cups shredded Monterrey jack cheese, divided
  3. 2 cups shredded cooked chicken
  4. 3 tablespoons butter
  5. 3 tablespoons flour
  6. 2 cups chicken broth
  7. 1 cup sour cream
  8. 1 (4 oz) can diced green chiles
  9. Salt and pepper, to taste
  10. Chopped, fresh cilantro for garnish
Instructions
First, I had put my frozen chicken breasts in the crockpot with a little chicken stock and 1/2 packet of Taco seasoning to slow cook all day. When I got home from work, they were easily fork-shredded and juicy.
  1. Preheat oven to 425 degrees. Spray a 9×13 inch baking dish with cooking spray; set aside.
  2. Mix the chicken together with 1 cup of the cheese.
  3. Distribute the chicken and cheese mixture evenly among the tortillas. Roll up and place seam side down in the prepared pan.
  4. In a large saucepan, melt the butter. Add the flour; cook and stir for 1 minute.
  5. Add the chicken broth, whisking until smooth. Continue cooking over medium heat until sauce is thick and bubbly.
  6. Stir in the sour cream and diced green chiles.
  7. Season with salt and pepper, to taste.

Funny story about those green chiles. I searched high and low in the grocery store for canned ones, nowhere to be found. Only cans had tomatoes in them too, like that Rotel stuff. So I bought 2 serrano chiles. I diced them and tried to saute them, but my pan was too hot. The result: smoke in your apartment that actually burns the back of your throat!

  1. Pour the sauce in an even layer over the enchiladas. Sprinkle with remaining cheese.
  2. Bake for 20 to 25 minutes or until golden and bubbly.
  3. Sprinkle with cilantro just before serving.

To this day this is one of my favorite things I’ve made. Will be making them again soon.

Chocolate Cream Swiss Roll & Bacon Roses

Valentine’s Day and my boyfriend’s birthday always fall near each other, hence why these posts are combined. I always make him homemade birthday cakes. In the past I’ve made Chocolate Peanut Butter Cakes, Red Velvet Cakes, and last year, a Batman cake. This year the bar was pretty high…so, since he loves Hostess, I made my first attempt at a homemade Ho-Ho cake. The only difference was this time, I made the cake batter, also from scratch. NO BOX MIX.

The recipe I followed came from the blogger: Cooking by Moonlight

CHOCOLATE SPONGE CAKE RECIPE


Ingredients
yields 1 1/2 sheet pan sponge cake
1/4 cup dutch processed cocoa powder
1/3 cup cake flour
1/4 t. salt
1 t. baking powder
1/2 t. instant coffee
4 eggs, yolks and whites in separate bowls
1/2 cup sugar
So I’d never made my own sponge cake before. It was a little tricky. Getting the egg whites just right…not sure if I hit the ideal, but it worked.

1) First, the prep. I lined a sheet pan first with cooking spray or vegetable shortening then with parchment paper across the bottom of the pan.

2) Pre-heat the oven to 425 degree.

3) I didn’t have a sifter (shame on me) but I mixed the dry ingredients (cocoa, cake flour, salt, baking powder, and coffee) and placed in a bowl to the side.

4) These were egg white instructions from Cooking By Moonlight:

“In a mixer with the whisk attachment whip the egg whites until they are at soft peaks.  This is also sometimes referred to as wet peaks.  You will know they are ready when you remove the whisk and the egg whites form a Dairy Queen ice cream cone like curl.  If they fall quickly and don’t create the curl keep going… if they stand straight up in the air… I’m sorry… start over .”

I tried, I tried really hard. But one second they were too wet and the next….I don’t know how you can stop it in time for there to be an in-between. I ended up with merengue and I didn’t look back. Sorry.

5) In a small mixing bowl mixed the egg yolks and sugar together until they became pale yellow.  Add the dry ingredients to the egg yolk mixture.

Cooking by Moonlight said the batter would be stiff, but forget stiff, there was almost no moisture for the batter to become batter! But they said not to worry so I plodded on.

6) Mixed in half the egg white mixture until completely incorporated. Finally folded in the last half of the egg whites. I tried not to over-stir, but it took forever to get all the white streaks out…

7) Then I poured onto the greased and parchment paper lined pan.  I used a spatula to spread the batter evenly “so you do not end up with a big cake on one side and a cracker like cake on the other.”  This was much easier said than done, because my parchment paper kept bunching….

I baked for 8 minutes, then removed cake from the oven and allow it to cool in the pan for a few minutes.  Tipped the cake over, pulled off the parchment paper, and rolled it up into a tea towel to cool.  According to Cooking By Moonlight, “This gives the cake form memory and will keep it from cracking after you have filled it with icing and roll it up.” It works like a charm every time.

9) After the cake cooled, I spread the Little Debbie Creme Filling (recipe below) evenly across the entire cake. Then we roll it all up!

10) The hardest part is placing the cake on the wire cooling rack without it unrolling or cracking! With a pan underneath, then I poured the chocolate ganache glaze over the top of the cake and tried to get it to cool. I thought it would be more like a shell, but it never set up all the way. So I ended up doing another layer of chocolate.

Cooking By Moonlight’s LITTLE DEBBIE CREME FILLING RECIPE

Ingredients
yields 1 batch
1 stick butter, softened
1/4 cup vegetable shortening
1 small (8oz) jar marshmallow creme
1 t. vanilla
1/4 t. salt
1 cup powdered sugar

Directions
1) Whip together the butter, shortening, creme, vanilla, and salt.  Slowly add the sugar.  If you are in a humid climate you may need to add up to an extra 1/4 cup powdered sugar to get the right texture.

Cooking By Moonlight’s CHOCOLATE GANACHE GLAZE RECIPE

Ingredients
yields 1 batch
1/2 cup heavy cream
4 oz (about 2/3 cup) dark or milk chocolate roughly chopped (or chocolate chips)

Directions
1) Heat the cream over medium heat until it begins to simmer.  Quickly remove from heat and pour in the chocolate.  Stir with a whisk until all chocolate has melted.


The cake was good, but I think I accidentally let it dry out trying to get the chocolate the set. Also, somehow, with only a mere 1/4 tsp. of salt, my frosting tasted way too salty. I tried to add more powdered sugar to balance, but I could still taste the gritty bite of salt in the frosting. Next, I won’t add any.

P.S. I finally found the guy equivalent of flowers! BACON flowers! He loved them!

Butternut Squash Soup with Carrots and Apples

IMG_2835.JPGOne of my favorite things I learned to make this fall was this easy Butternut Squash Soup. It became my comfort staple. So easy, so smooth, and full of great vitamins and nutrients!

I began by cutting up a big butternut squash, 2-3 large carrots, and 1 apple (whatever I had on hand).  I’d fill a large pot with water and simmer them all together, sometimes throwing in a clove of garlic, until they were fork tender. I’d then drain the water and pour them into my food processor and hit puree.

Once they were smooth, I’d put the mixture back in my pot and add some salt, a little pepper, and if I had it on hand, maybe a little heavy cream to make it a bisque, but trust me, this soup doesn’t need it. It’s so naturally sweet and rich, like orange liquid gold.

Cider & Citrus Brined Turkey with Brandy & Tangerine Glaze

IMG_2879

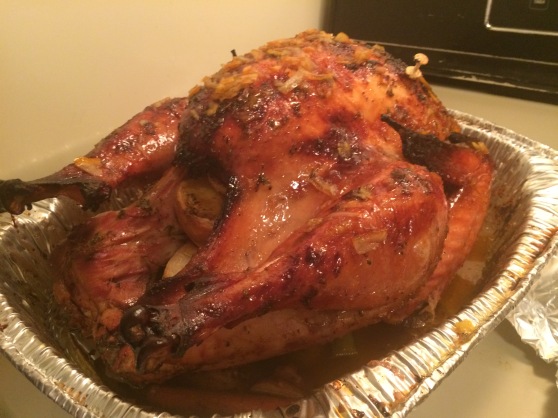
This Thanksgiving, I wanted to make my very own and very first Thanksgiving Turkey. It was an extreme undertaking, and I totally underestimated the effort involved. It’s taken me this long to even blog about it! However, with the help of my loving boyfriend, we prevailed.

First up, the turkey:

  • 1 – 17lb. frozen turkey, thawed, with neck & giblets removed, which felt like I was this turkey’s gynecologist…

Then, I brined him.

For the Brine, I did a Cider and Citrus Turkey Brine with Herbs & Spices, recipe by Wicked Good Kitchen™.   I wanted something that smelled amazing.

  • For the Apple Cider, Herb & Spice Infusion
    • ¾ to 1 gallon (12 to 16 cups) apple cider
    • 1¼ cups kosher salt
    • 6 cloves garlic, minced
    • 6 whole bay leaves
    • 4 sprigs fresh rosemary
    • 4 sprigs fresh sage
    • 4 sprigs fresh thyme
    • 3 tablespoons whole black peppercorns
    • ground cinnamon
    • ¾ to 1 gallon (12 to 16 cups) chilled water, preferably distilled
  • For the Citrus & Onion Infusion
  • 3 medium to large oranges, cut into wedges with rind intact
  • 2 large lemons, cut into wedges with rind intact
  • 2 medium yellow onions, cut into wedges with skin intact
In a large pot, I brought the ¾ gallon (12 cups) apple cider, salt, garlic, herbs and spices to a boil.  Removed from heat, then added water to cool liquid slightly.
Preparing the Brine with Citrus & Onion Infusion:
After the Apple Cider, Herb & Spice Infusion had cooled somewhat (no longer very hot, but still very warm), I squeezed the oranges and lemons in, dropping the rinds in after. Next, added the onion wedges. I let it steep for 2 hours.  Then I had to add the damn bird.
This was the terrifying part. We put him in the oven bag, in the roasting pan for support. I asked my boyfriend to hold open the top while I poured in the brine. Well, I missed. I sent half my bring BEHIND THE STOVE.
Well, half an hour of pulling the stove out and wiping down the floor later, the turkey was finally bring brined in his bag in the fridge. Whew. Left in him there overnight to think about what he’d put me through.
The next morning, I got up at 5am to cut up the carrots and celery stalks. My boyfriend had promised to get up and help, but since this was my crazy idea, I didn’t have the heart to wake him. I wresstled the turkey out of his brine, and laid him out on the cutting board to pat him dry.  It was like trying to bathe and towel off a gigantic baby. I got the roasting pan out and put the cut veggies to the bottom to act as a rack. I then stuffed my bird with this Cider, Citrus & Herb Aromatics recipe:
  • 2 tangerines, quartered with rind intact
  • 1 medium onion, cut into wedges with skin intact
  • ground cinnamon
  • 1 cup apple cider
  • 4 sprigs fresh rosemary
  • 4 sprigs fresh thyme
  • dried rubbed sage
  • Kosher salt and freshly ground black pepper

I wish I’d have had some butcher’s twine for his legs, but it all worked out ok.

I was trying extra hard to make sure this guy had a fun flavor, so I even tackled this Herbed Tangerine Compound Butter.

  • For the Herbed Tangerine Compound Butter
  • 1½ cups (3 sticks) unsalted butter, softened to room temperature
  • 2 tablespoons extra virgin olive oil
  • 1½ tablespoons finely chopped fresh rosemary leaves
  • 1 tablespoons rubbed sage
  • 1 tablespoons dried thyme leaves
  • 2 tablespoons fresh tangerine juice
  • 1 tablespoon fresh tangerine zest
  • Kosher salt and freshly ground black pepper, to taste
WickedGoodKitchen’s recipe here:
In a medium bowl, combine butter and olive oil. Add herbs, tangerine juice and zest. With a fork or wooden spoon, mash and fold butter and flavorings until combined. Season with salt and pepper; mix until smooth and well blended. Alternatively, 1½ cups unsalted butter, salt and pepper can be used for a simpler preparation before roasting.
But this is the part I missed…..I should have read a little closer….”Working with hands, use fingers to carefully loosen the skin of the turkey breasts and legs. Work the compound butter or unsalted butter under the skin and then all over the top of the skin of the bird.”
Whoops. I just spread it all over the top of him! 45 minutes in the oven and it was all down in the bottom of the pan. Oh well, live and learn to read directions.
OK, but back to the beginning of cooking this bird. Of course, this is when my boyfriend groggily appears and asks him he can help! I let him put the turkey in the 425°F. oven until it browned, for about 30-45 minutes. Then, we reduced oven temperature to 325°F., basted the turkey with pan juices, covered him with foil, and….went back to sleep. At least until my periodic alarms! For the next 4-5 hours, I was in a basting and sleeping cycle, continuing to roast the turkey and basting every 30 minutes and rotating the pan.
Once I was close to done, I made this special Apple Cider, Brandy & Tangerine Glaze:
  • 1 cup orange marmalade
  • 1 cup brandy
  • 5 tablespoons apple cider
  • 2 tablespoons apple cider vinegar
  • 1 teaspoon kosher salt (or ½ to ¾ teaspoon regular table salt)
  • 2 tablespoons unsalted butter
WickedGoodKitchen: Prepare the Apple Cider, Brandy & Tangerine Glaze: In a small saucepan, combine marmalade, brandy, apple cider, cider vinegar and salt. Bring to a boil over medium-high heat. Reduce heat to low and simmer uncovered, stirring occasionally, until thickened to syrup consistency and reduced to 1 1/2 cups, about 10 to 12 minutes. Remove from heat and stir in butter until well blended. Set aside to cool completely.
I used the glaze by brushing half of the glaze (¾ cup) over the uncovered turkey (remove any foil, first) just before the last hour to hour and a half of roasting time. Once he was finished roasting, he got the remaining glaze (¾ cup)
He was beautiful. Moist, tender, huge.  I served to my boyfriend and his parents. I was so proud, but I said to him after: If I ever have the idea to do this again for less than 5 people, STOP ME. 🙂
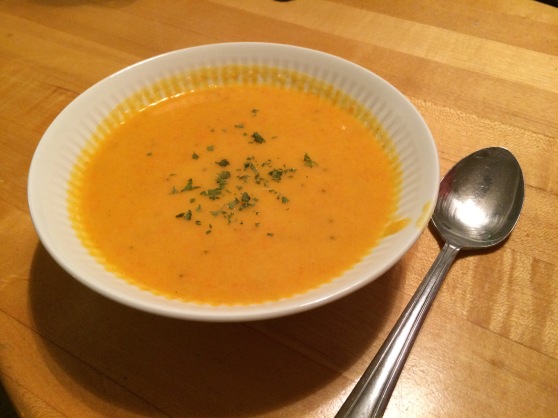
 

Spinach and Mozzarella Stuffed Portobello Mushrooms

Spinach and Mozzarella Stuffed Portobello Mushrooms

Spinach-Artichoke-Stuffed-Portobellos-2

  • 4 large portobello mushroom caps, stems and gills removed

  • 1 egg

  • 2 clove garlic, minced

  • salt and ground black pepper to taste

  • 1 (10 ounce) bag fresh spinach, chopped

  • 1 roma tomato, chopped
  • 1 teaspoon tomato paste
  • 1 cup shredded mozzarella cheese, divided

  • 3 tablespoons panko bread crumbs, divided

Directions

  1. Preheat oven to 350F.
  2. Take spoon and scrape gills out. Discard.
  3. Brush both sides of each portobello mushroom cap with olive oil. Arrange mushroom on a baking sheet, gill sides up.
  4. Bake mushrooms in the preheated oven until tender, about 12 minutes. Drain any juice that has formed in the mushrooms.
  5. Beat egg, garlic, tomato, tomato paste, salt, and black pepper together in a large bowl.
  6. Stir spinach, mozzarella cheese, and 3 tablespoons bread crumbs into the eggs until evenly mixed.
  7. Divide spinach mixture over mushroom caps; sprinkle mushrooms with remaining 1 tablespoon mozzarella cheese and 1 tablespoon bread crumbs. Return mushrooms to the oven.
  8. Continue baking until topping is golden brown and cheese is melted, about 10 minutes more.

Courtesy of Allrecipes.com

Cherry Rhubarb Glazed Salmon on Wilted Spinach

Cherry Rhubarb Glazed Salmon on Wilted Spinach.

SONY DSC

Warning: It was so good, there was no time for pictures, so this one is courtesy of idlewife.blogspot.com, as well as the guidance on this recipe.

I bought a nice piece of salmon from the seafood counter, but was searching for something fun to do with it.

Then I came across this blog post:

balsamic cherries on salmon

Ooooo.

Realizing I had no balsamic, I improvised. I covered the salmon in honey, with a dash of salt and pepper, and a splash of Worchestershire sauce. I put it in the oven at 350 for 30, then finished it at 400 for 10.

I halved and pitted by sweet cherries, about 2-3 handfuls (I know, super precise), and tossed them in a sauce pan with a stalk of chopped rhubarb ( I made rhubarb muffins earlier this week and had extra). Added a dash of olive oil, and enough red wine vinegar to cover the bottom of the pan, and let it reduce. I periodically added dashes of sugar and a tablespoon of water here and there to keep up a sauce-like consistency. A little salt and pepper to taste at the end.

The spinach I warmed slightly in a pan, tossed in a drizzle of olive oil. Scattered with some thinly sliced onions and a dash of pure red wine vinegar over the leaves.

Once the salmon was done, I served the cherry rhubarb glaze over the it, on the bed of spinach. Looks fancy and is full of nutrients and antioxidants!

Peach and Blueberry Greek Yogurt Cake

IMG_1784

Ingredients:

  • 1 and 1/2 cups all-purpose flour
  • 1 teaspoon baking powder
  • 1/2 teaspoon baking soda
  • 1/2 stick butter, softened
  • 1 cup sugar
  • 2 eggs
  • 1/2 teaspoon vanilla
  • 1/2 cup Greek yogurt
  • 2 peaches, sliced into wedges
  • 6 oz blueberries
  • 1 teaspoon granulated sugar

DIrections:

  1. Preheat oven to 350°F with rack in middle. Grease the side and the bottom of the pan with butter or cooking spray. Line the bottom of a 9×3-inch springform pan (or 9 inch round cake pan) with parchment paper. Grease the parchment paper too.
  2. Sift flour, baking powder, baking soda, together into a medium bowl.
  3. In a separate bowl, beat butter, sugar, and 2 eggs until very light in color and fluffy, 2-3 minutes on high speed. Add vanilla and Greek yogurt and continue beating until very creamy and light in color, for about 1 more minute.
  4. Keeping the mixer speed low, mix in the flour mix until combined. Do not overmix.
  5. Transfer the cake batter to the springform pan. Top with sliced peaches, and scatter blueberries evenly on top in the spaces between the peach slices. Sprinkle the fruit with 1 teaspoon granulated sugar.
  6. Bake until cake turns golden, and the tester comes out clean in the center, about 1 hour, depending on your oven. Midway through baking, I like to put some extra peach slices and extra blueberries on top of the cake for prettiness, and return cake to baking.
  7. When the cake is done baking, let it cool (still in the baking pan) on a wire rack. After cake has cooled for about 40 minutes, release the cake from the springform pan. At this point, if the cake is cool enough, you can slide your hand under the cake, between the parchment paper and the bottom portion of the springform pan and move the cake with the parchment paper attached to its bottom onto a cake plate easily.
  8. If using a 9 inch round cake pan, cook in pan for about 40 minutes or more (up to 1 hour, depending on your oven), then invert onto a plate.

Result: Good flavors but a little dense. While posting this I realized what a springform pan was, and since I didn’t have one, I probably should’ve only baked for 40 minutes, according to Step 8. Next time!

Courtesy of: Juliasalbum.com and Pinterest

Broccoli, Ham and Cheese Quiche

 IMG_1783
Ingredients:
  • 16 ounces precooked shredded potatoes or frozen hash browns (thawed)
  • 7 eggs
  • 2 tablespoons all-purpose flour
  • 1 tablespoon canola oil or extra-virgin olive oil
  • 1/4 teaspoon salt
  • 2 cups finely chopped broccoli florets
  • 1 cup shredded extra-sharp Cheddar cheese
  • 3/4 cup finely diced smoked ham
  • 3/4 cup reduced-fat sour cream
  • 1/8 teaspoon freshly ground pepper

Directions:

  1. Preheat oven to 375°F. Generously coat a 9-inch springform pan with cooking spray. Line a rimmed baking sheet with foil.
  2. If using hash browns, squeeze any excess moisture from the thawed potatoes. Toss shredded potatoes (or hash browns) with 1 egg, flour, oil and salt in a medium bowl. Pat the mixture into the bottom and 2 inches up the sides of the prepared springform pan. Bake until the potatoes are beginning to brown at the edges, 35 to 40 minutes.
  3. Fill the crust with broccoli, cheese and ham. Whisk the remaining 6 cups egg substitute, sour cream, chives and pepper in a medium bowl. Place the pan on the prepared baking sheet and pour the egg mixture over the filling.
  4. Bake the quiche until the center is just set, 50 minutes to 1 hour. Let cool for 15 minutes. Run a knife around the edges to loosen the sides, remove the pan sides and cut the quiche into wedges.

Tips and Notes:

  • Make Ahead Tip: Prepare crust; cool, wrap and refrigerate for up to 1 day. Let stand at room temperature while you continue with Step 3 and preheat oven.

Result: A little dry….more sour cream next time?

Courtesy of: EatingWell.com

Overnight Strawberry Cheesecake French Toast Casserole

 IMG_1753
Ingredients
  • 10-12 slices day old French
  • 8 oz light cream cheese
  • 1/2 cup granulated sugar
  • 1 egg
  • 1 tsp lemon juice
  • 7 eggs
  • ¾ cup milk
  • 2 tsp vanilla extract
  • 1 tsp cinnamon
  • ½ tsp ground nutmeg
  • 2 cups sliced strawberries

Directions:

  1. Lightly grease a 9 x 13 baking dish.
  2. Beat cream cheese until light and fluffy.
  3. Beat in sugar until thoroughly combined.
  4. Beat in 1 egg and lemon juice until thoroughly combined. Set aside.
  5. Whisk together eggs, milk, vanilla extract, cinnamon and nutmeg. Set aside.
  6. Schmear bread with cream cheese mixture. Layer on sliced strawberries. Place another slice of bread on top to create a sandwich. Repeat for all slices of bread.
  7. Cut into cubes and place approximately two-thirds of the sandwich cubes into baking dish.
  8. Top with remaining strawberries and drizzle remaining cream cheese mixture over the top.
  9. Place remaining sandwich cubes on top.
  10. Finally, pour egg mixture over the top.
  11. Press down lightly and cover with plastic wrap.
  12. Refrigerate over night.
  13. Remove from refrigerator and let rest while you preheat the oven to 350 degrees.
  14. Cover with foil and bake for 30 minutes.
  15. Remove foil and bake for another 25-35 minutes or until the surface is golden and the center is set.
  16. Serve with maple syrup or additional fresh strawberries and whipped cream.

Result: Best thing I’ve ever made 🙂

Courtesy of: momontimeout.com